Disclaimer
All screenshots in the article were taken in the Dutch version of Yuki.
Depending on the type of GL account, different period post-editing functions are available for invoices, bank transactions, general journal entries and the GL account.
ATTENTION!
For a GL account with outstanding items (invoices and bank transactions), other post-editing functions are available.
For a detailed description, see the article Post-editing functions GL account with outstanding items.
Only a user with the 'Back office' role in the domain or the 'Financial ddministration' or 'External Accountant' role can use these post-editing functions.
From this screen, a user can:
- use the post-editing functions for an invoice:
- change the period (move document)
- spread over periods
- change transaction details (invoice number, VAT code and/or GL account)
- assign a project
- change or delete an assigned project
- revert.
- use the post-editing functions for a bank transaction or general journal entry:
- change the period (move bank transaction)
ATTENTION!
This post-editing function is not available for a general journal entry - change the GL account
- assign a project
- change or delete an assigned project
- change the period (move bank transaction)
- use the post-editing functions for a GL account:
- change the balance
- move balance to another GL account
- revalue ((only available with a foreign currency bank account)
(see article Revalue bank account or outstanding foreign currency invoice) - add a transaction.
TIP!
The post-editing entries for a GL account can also all be posted as year-end corrections.
Access to GL account
To access:
- open a GL account from the trial balance
OR - open a GL account from the chart of accounts
OR - click on the GL account in an open processed document.
The following screen is opened:
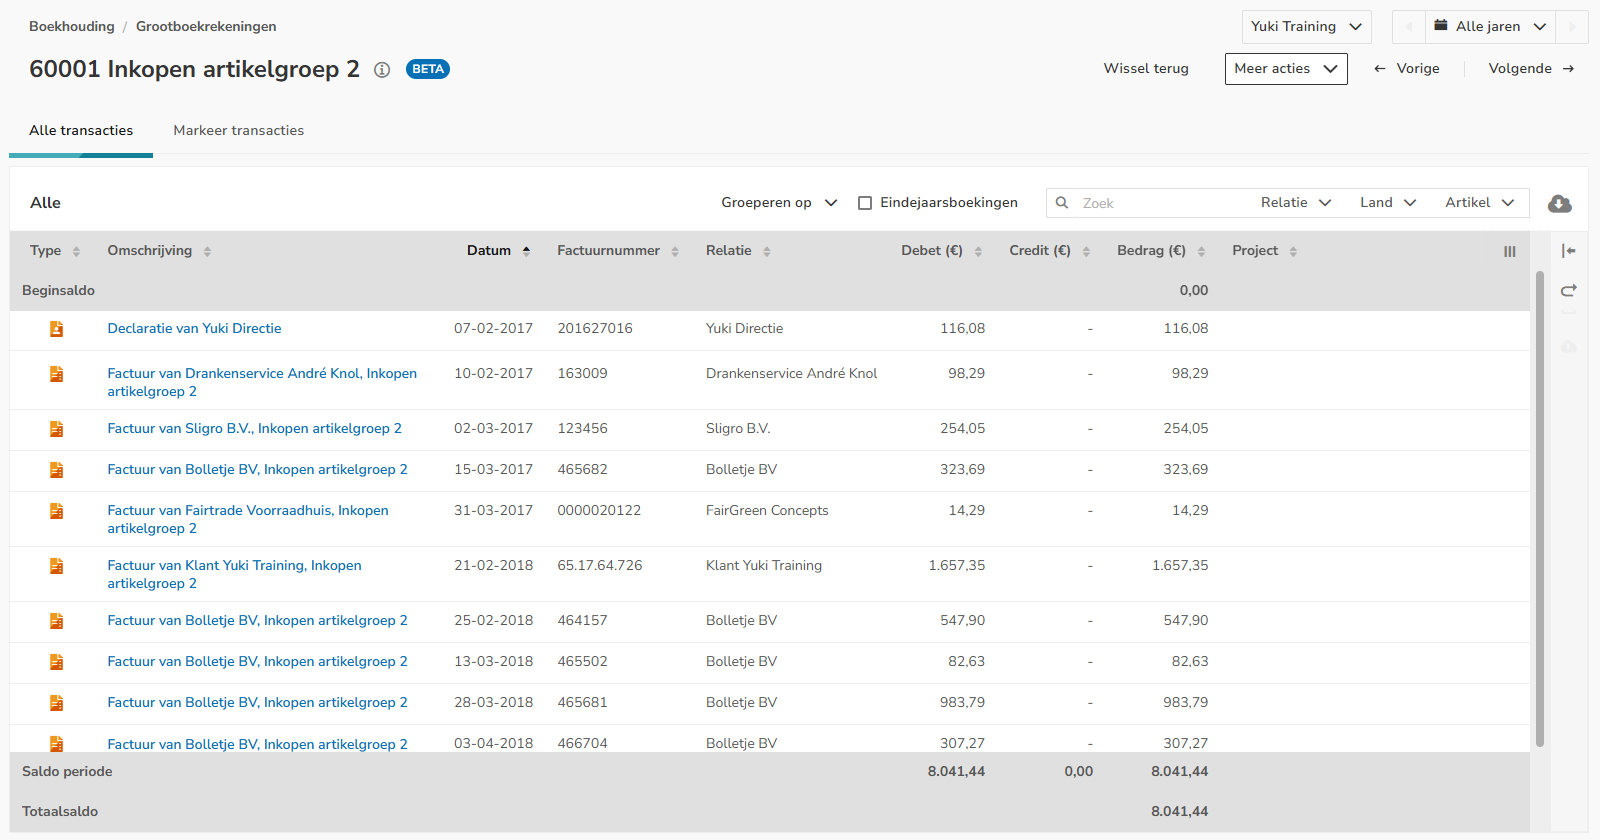
Resizeable document viewer
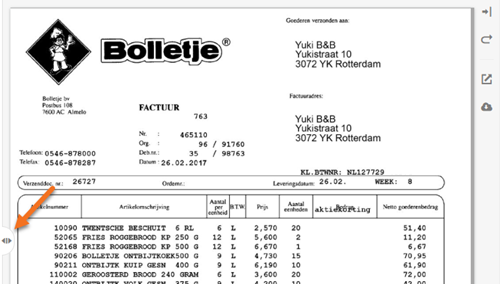
Click on the relevant invoice line and then on the Show / Hide button (icon with a right / left arrow) to show or hide the document preview on the screen.
To enlarge the displayed document preview, move your mouse over the two arrows to the left of the document preview and resize it to the final size.
Additionally, in the document viewer you can:
- reset the document preview to the default size (curved arrow icon)
- open the document in the browser (square icon with a top-right arrow)
- download the document (cloud icon with a down arrow).
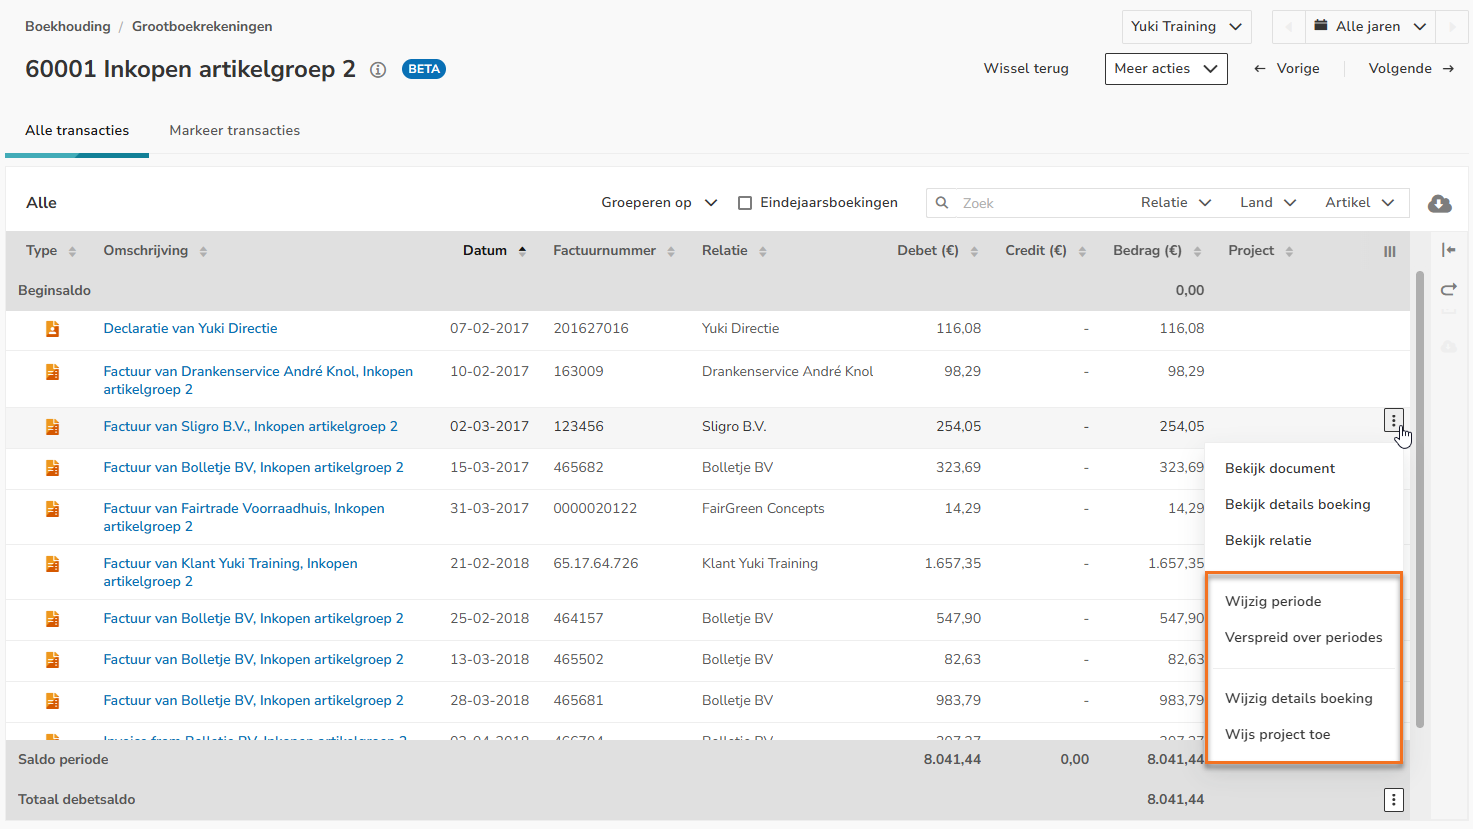
Post-editing functions for invoice
To use the post-editing functions for an invoice:
- hover over the line of the invoice in question
- click on the button with the three dots
- then select from the dropdown menu the post-editing function you want to use:
Change period (move document or bank transaction)
The recorded costs or revenue can be moved to another period:
- previous financial year
- previous month
- next month
- next financial year
- adjusted date.
To change a period:
- hover your mouse over the line of the invoice or bank transaction in question
- click on the button with the three dots
- select Change period from the dropdown menu
The following screen is opened: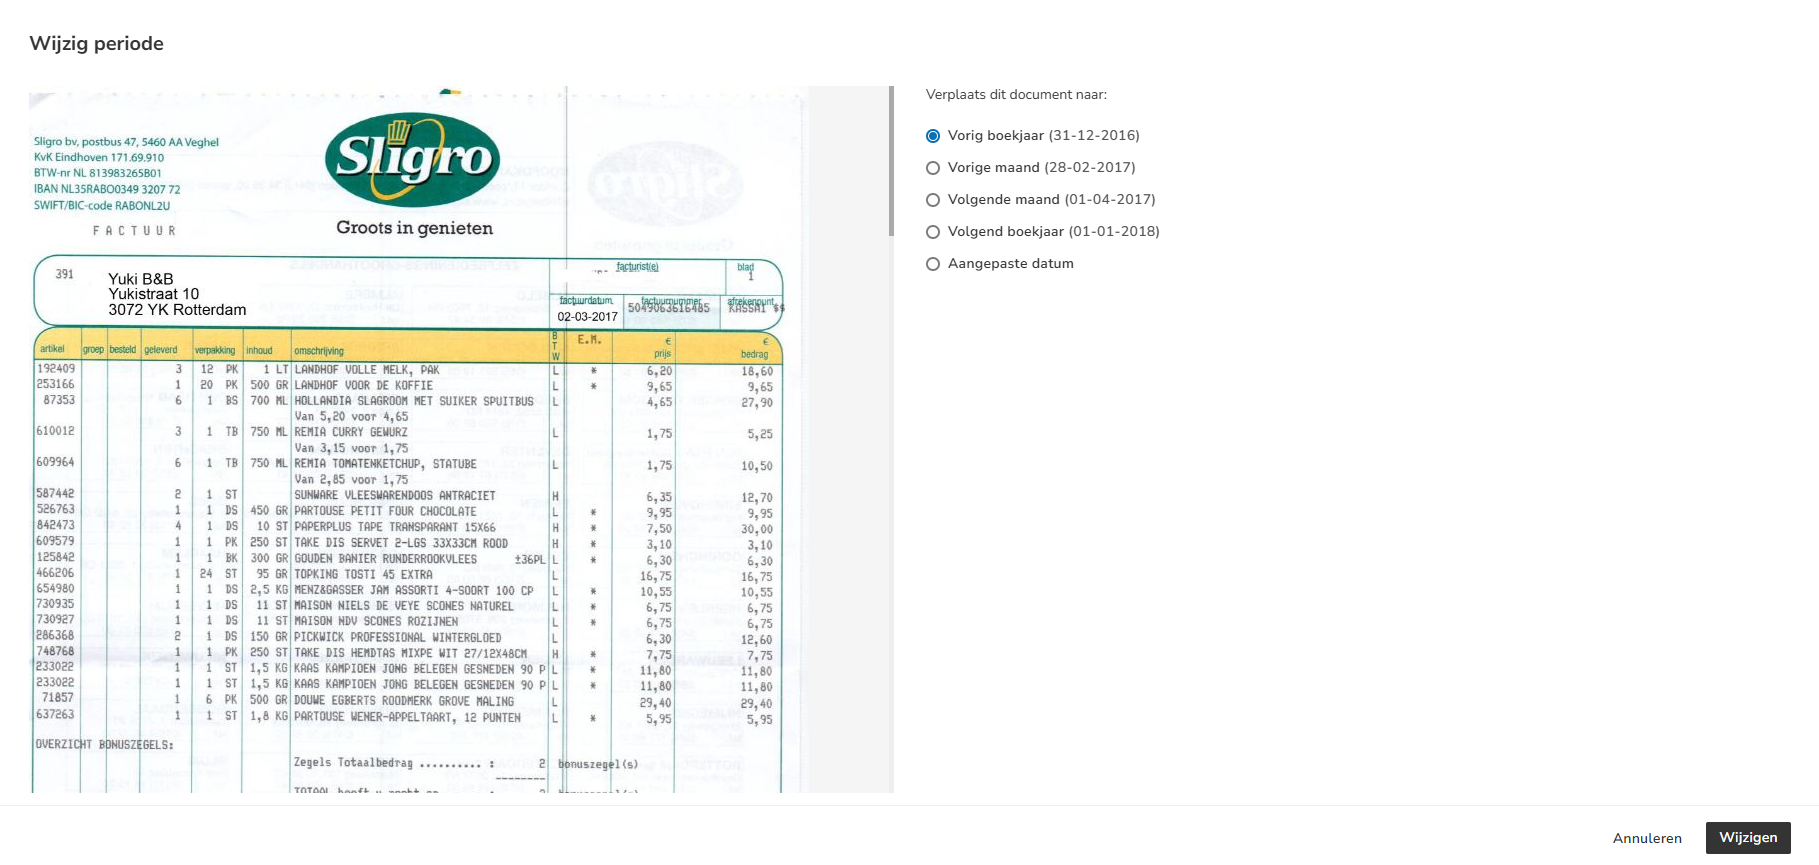
- select the period
- then click on the Change button.
TIP!
If you want to move the invoice or bank transaction to a specific date, select Custom date and choose the appropriate date in the calendar.
An icon will now be shown behind the relevant invoice or bank transaction in the screen:
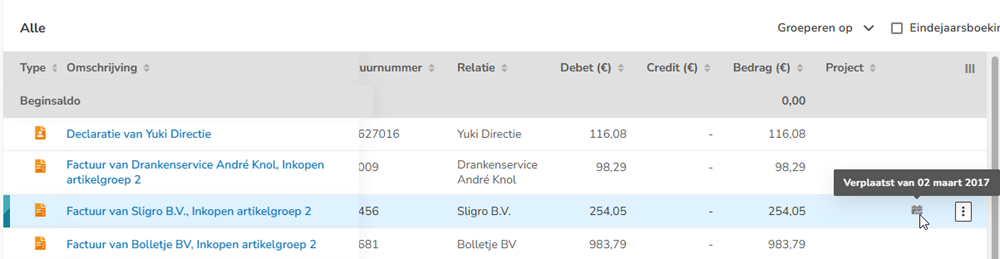
Undo period change
To undo the period change:
- click on the button with the three dots
- select Revert period change in the dropdown menu
The following screen is opened: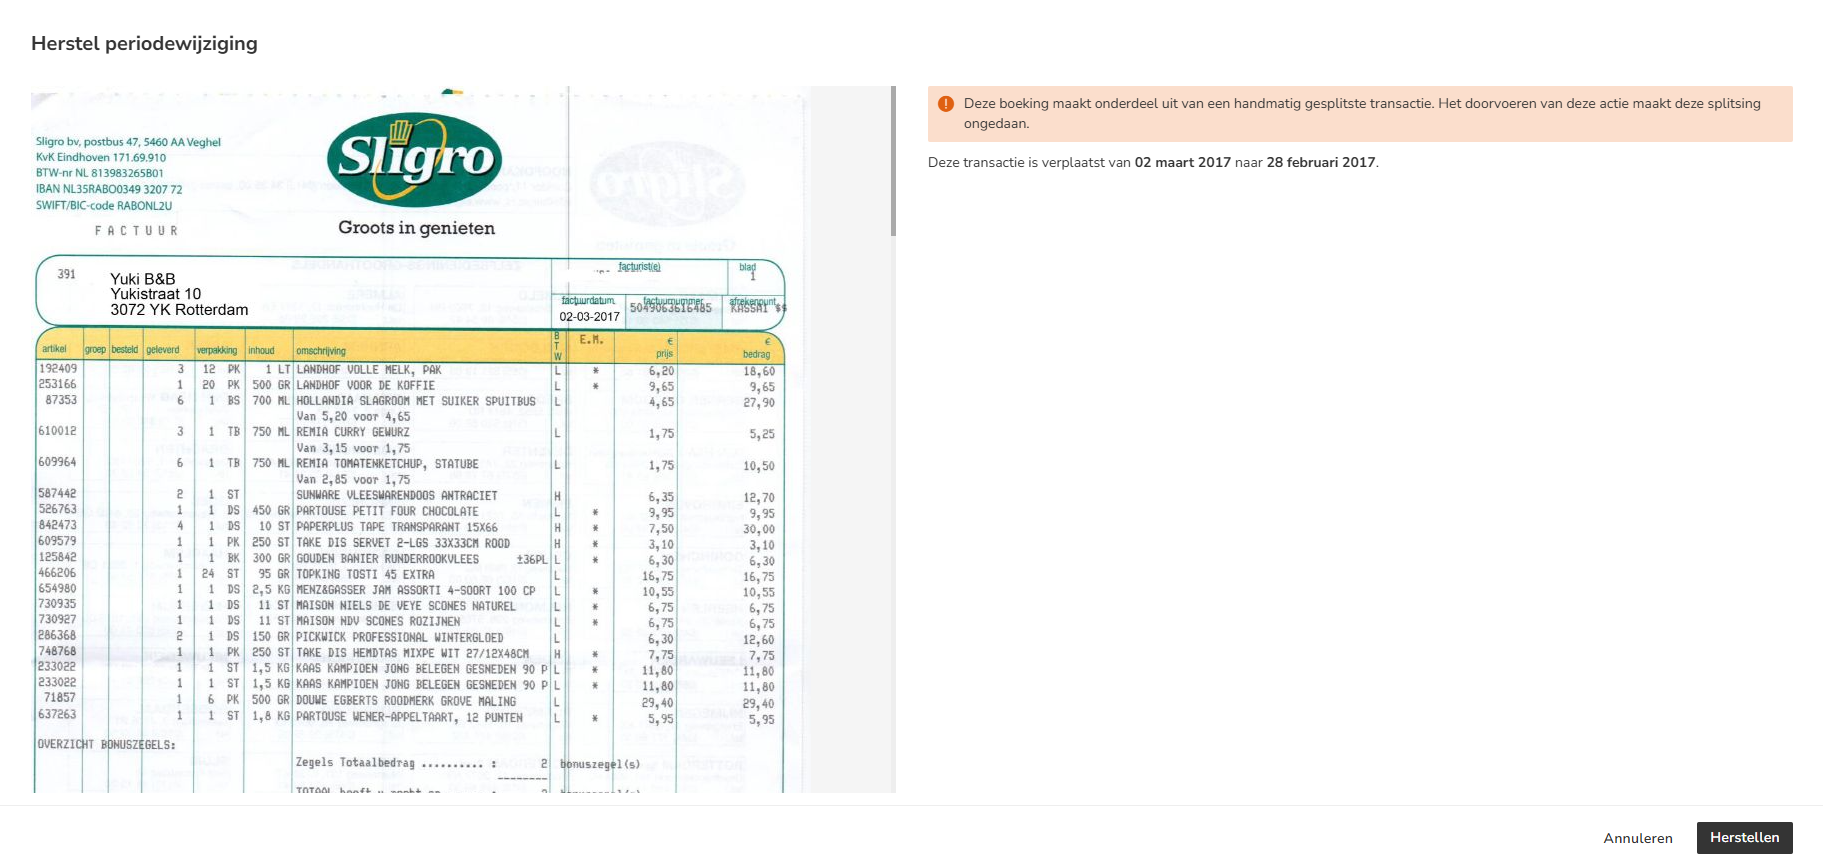
- then click on the Revert button.
Spread over periods
You can spread the recorded costs or revenue over a number of months starting from a specific date. .
To spread over periods:
- hover your mouse over the line of the invoice in question
- click on the button with the three dots
- select Spread over periods from the dropdown menu.
The following screen is opened: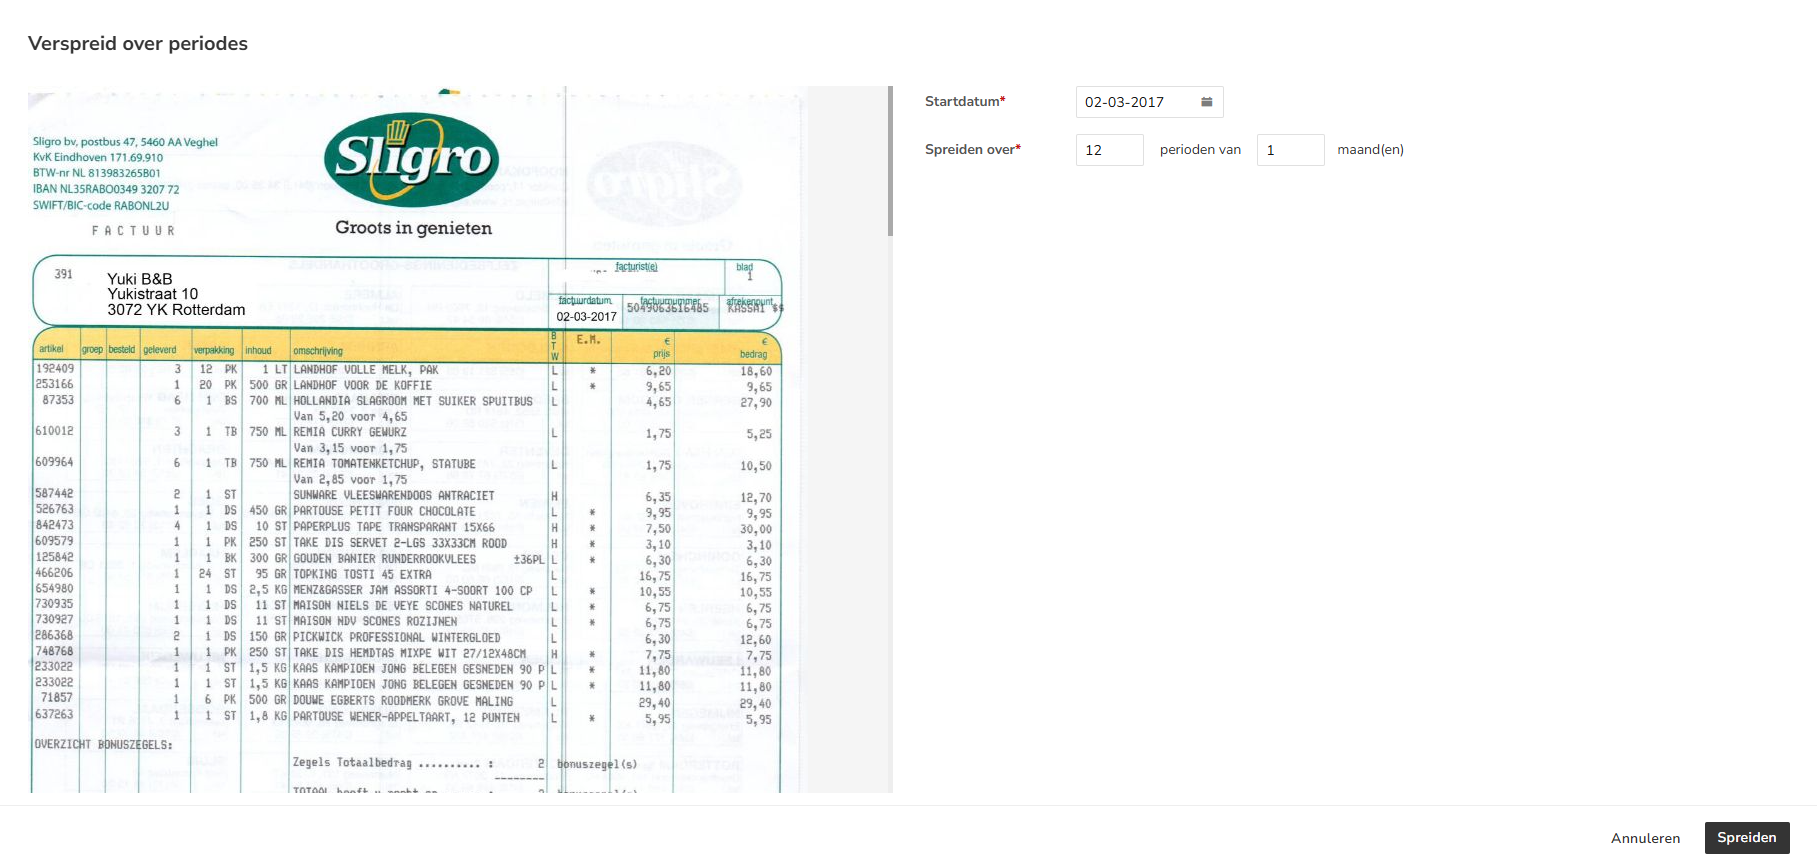
- enter the start date and specify how the costs or revenue should be spread
- then click on the Spread button.
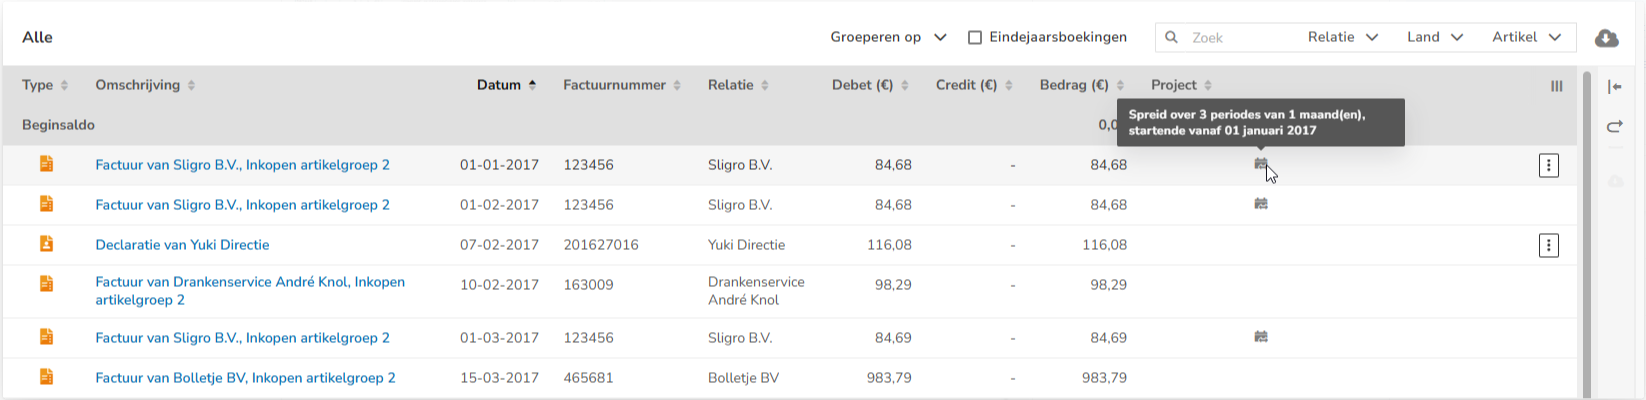
An icon is shown behind the spread costs or revenue in the screen:
Undo spreading over periods
To undo the spreading over periods:
- click on the button with the three dots
- select Revert spread over periods from the dropdown menu
The following screen is opened:
- then click on the Revert button.
Change transaction details
If necessary, the invoice number, VAT code and GL account of an invoice can be changed.
You can change a GL account, for example, because the invoice was posted to GL account '23020 Unclear transactions' or an incorrect GL account.
To change the transaction details:
- hover your mouse over the line of the relevant invoice
- click on the button with the three dots
- select Edit transaction details from the dropdown menu
The following screen is opened: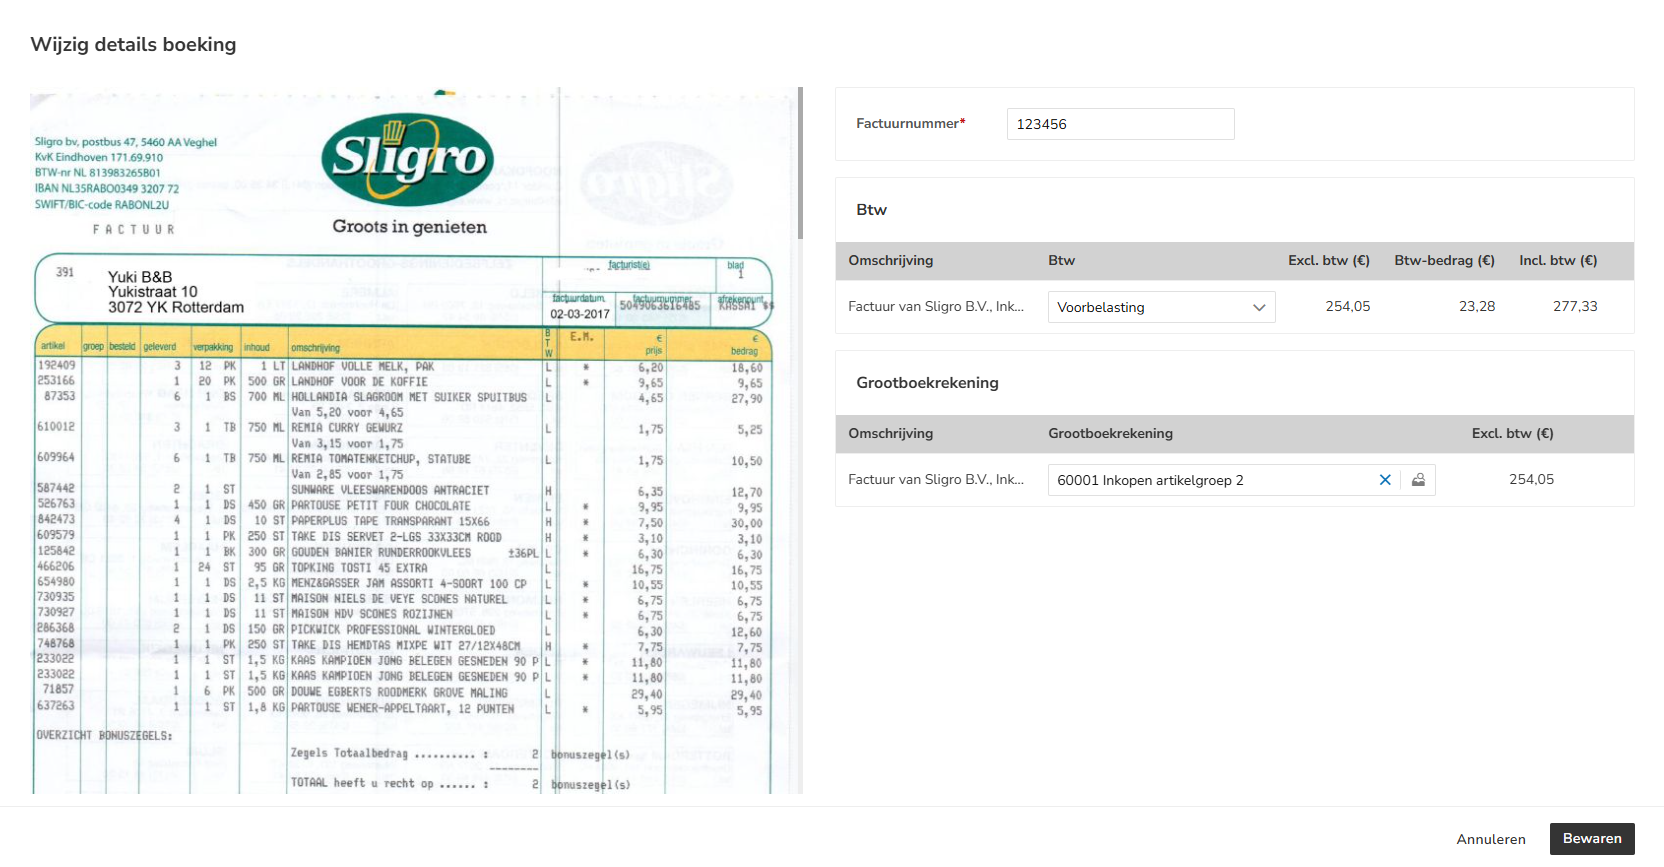
- change the invoice number, VAT code and/or GL account
- then click on the Save button.
Assign project
An invoice can be assigned to a project.
ATTENTION!
This post-editing function is only available when a user with the 'Management' role has selected the Medium, Large or Unlimited bundle through the Yuki Store in the domain.
To assign a project:
- hover your mouse over the line of the invoice in question
- click on the button with the three dots
- select Assign project from the dropdown menu
The following screen is opened: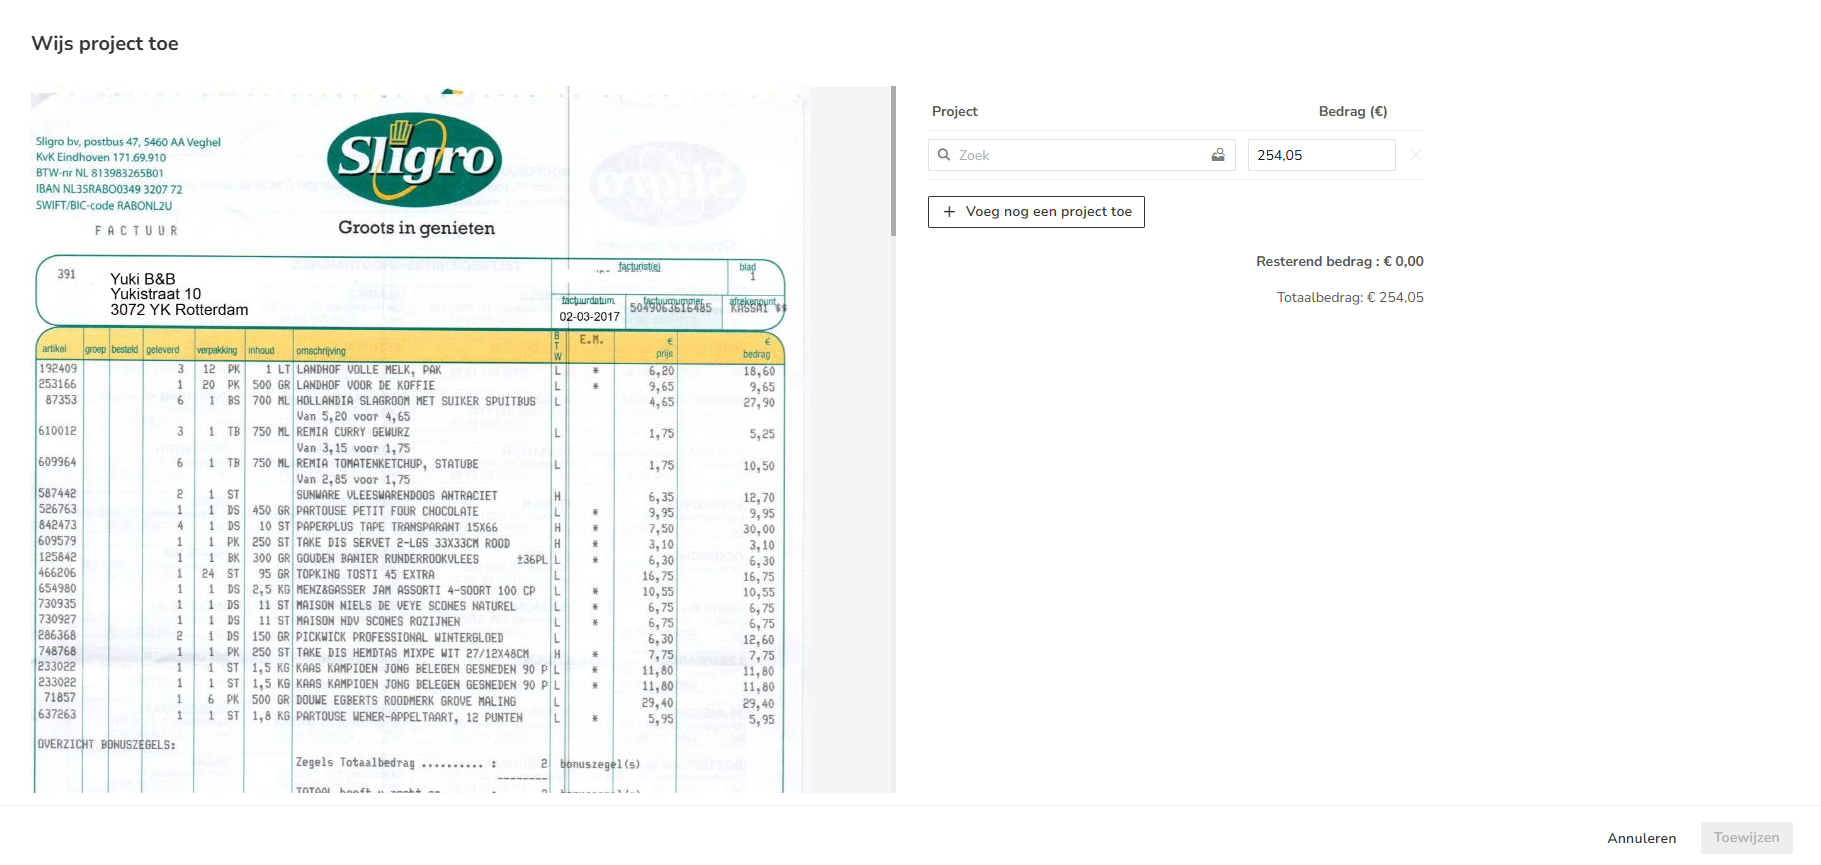
- select the project you want to assign
- then click on the Assign button.
The following message appears on the screen: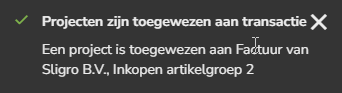
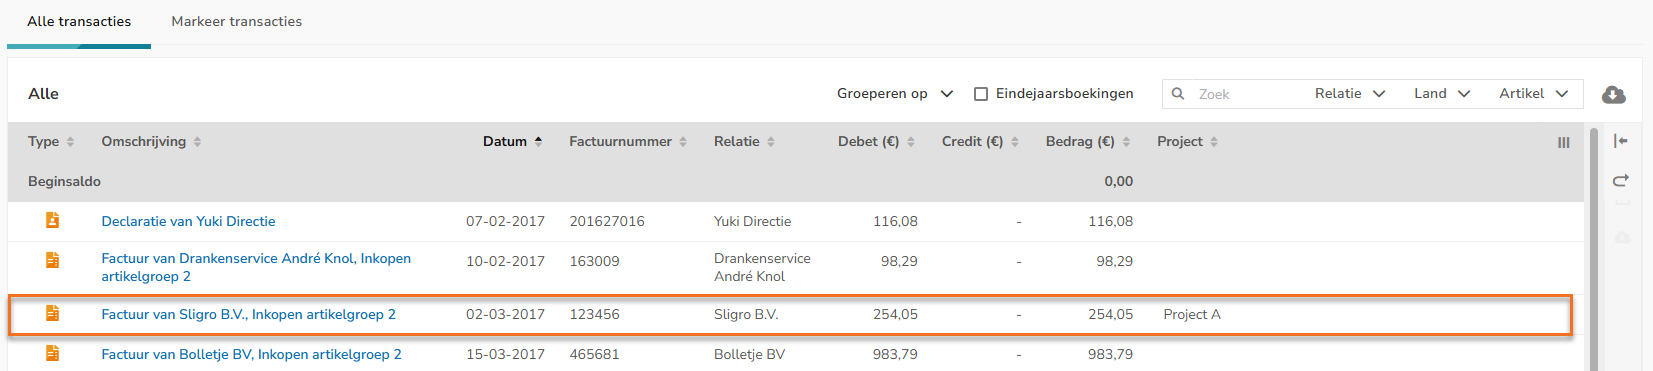
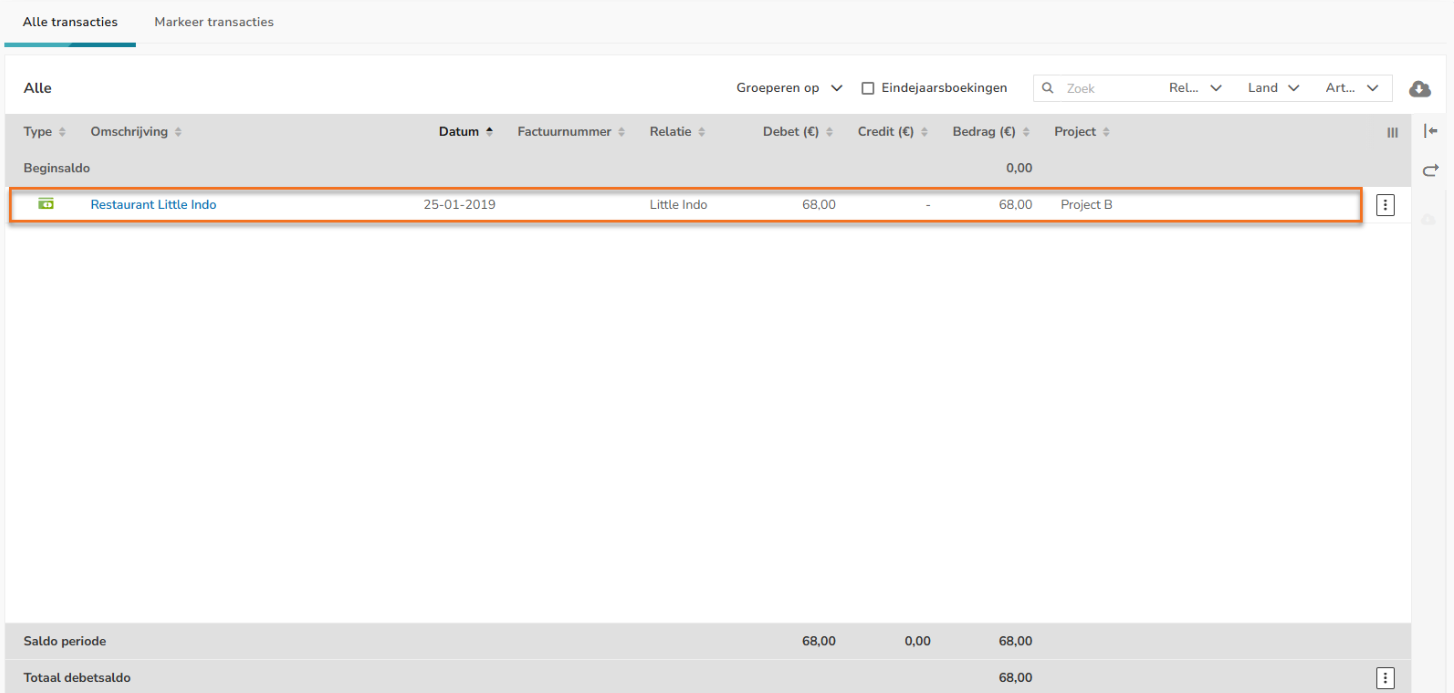
The screen now shows the project assigned to the invoice in the 'Project' column:
For a detailed description, see article Link invoice transactions (at line level) to project.
Change or delete assigned project
A project assigned to an invoice can always be changed or deleted.
To change or delete an assigned project:
- hover your mouse over the line of the invoice in question
- click on the button with the three dots
- select Edit assigned project from the dropdown menu
The following screen is opened: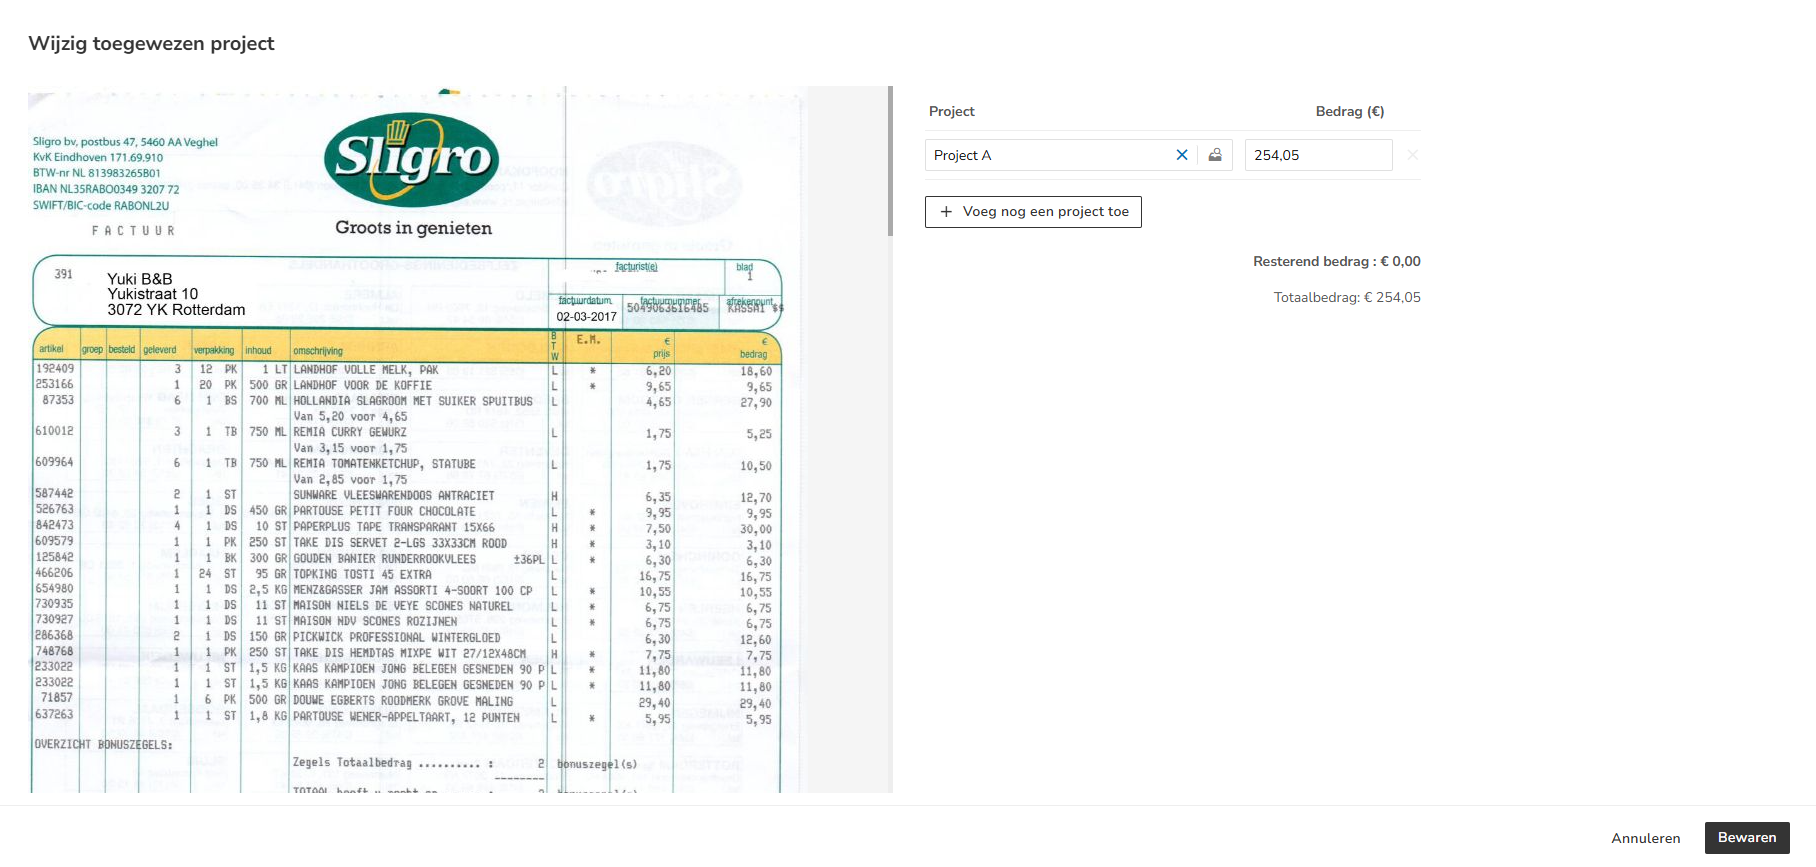
- change or delete the assigned project
- then click on the Save button.
Post-editing functions for bank transaction or general journal entry
To use the post-editing functions for a bank transaction or general journal entry:
- hover over the line of the relevant bank transaction or general journal entry
- click on the button with the three dots
- then select from the dropdown menu the post-editing function you want to use:
Change period (move document or bank transaction)
The recorded costs or revenue can be moved to another period.
For a description of the procedure, see 'Post-editing functions for invoice, Change period (move document)'.
Change GL account
You can change the GL account of a bank transaction or general journal entry, if necessary.
To change the GL account:
- hover your mouse over the line of the relevant bank transaction or general journal entry
- click on the button with the three dots
- select Change GL account from the dropdown menu
The following screen is opened: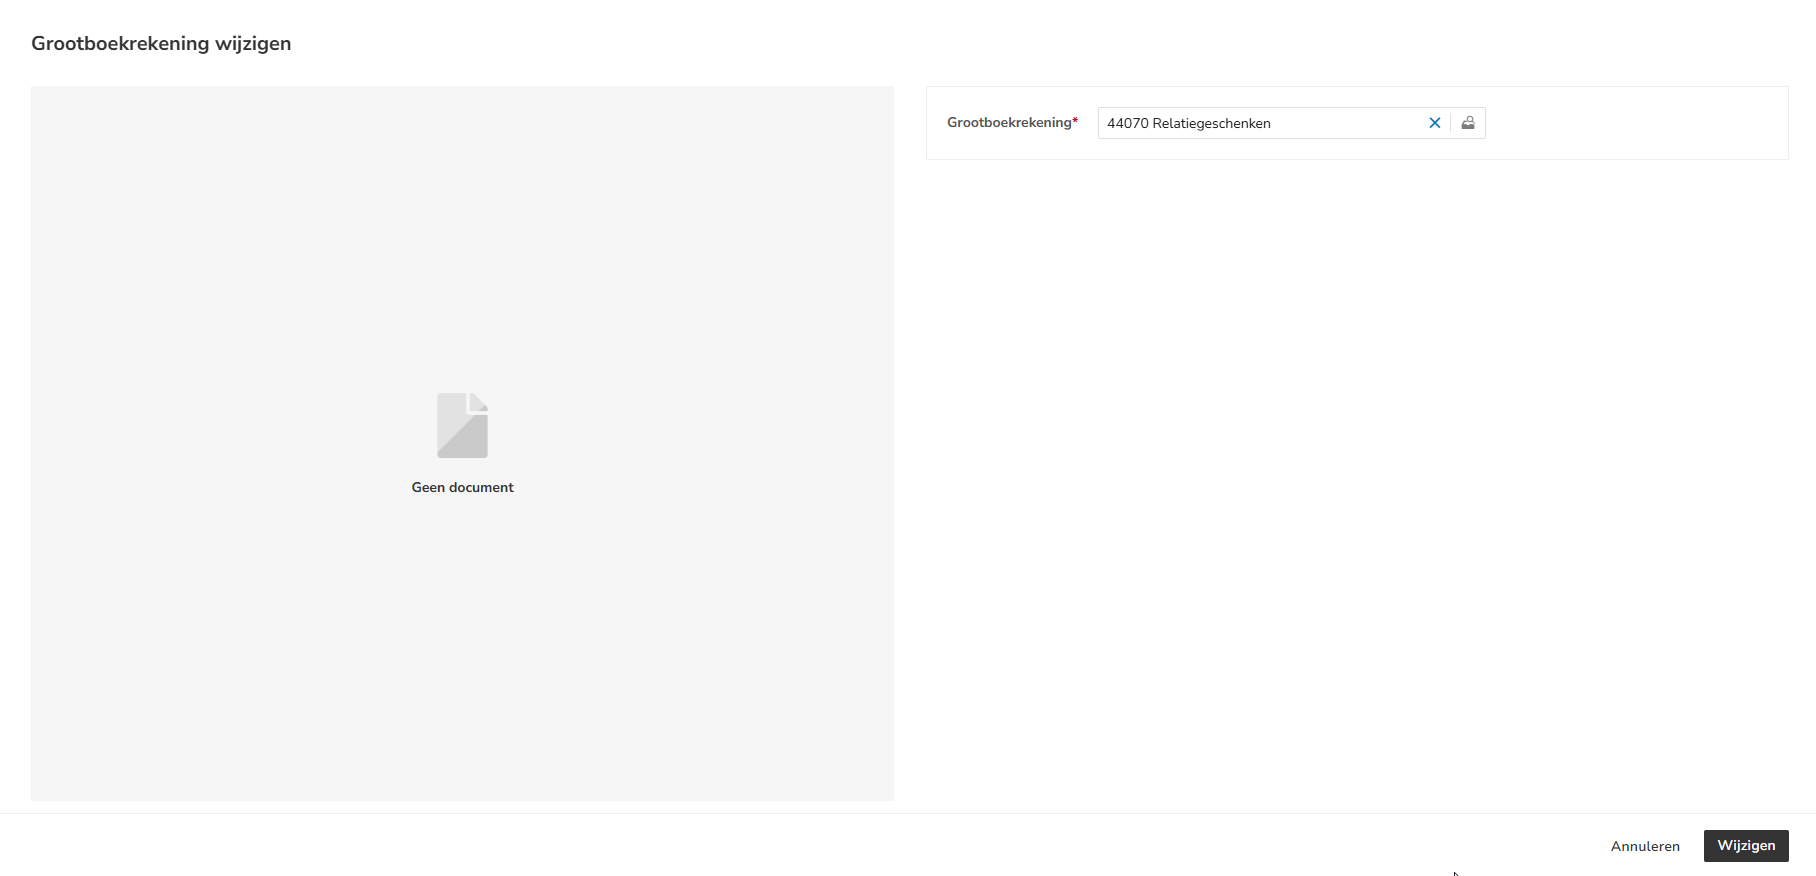
- select the correct GL account
- then click on the Change button.
Assign project
A bank transaction or general journal entry can be assigned to a project.
ATTENTION!
This post-editing function is only available when a user with the 'Management' role has chosen the Medium, Large, or Unlimited bundle via the Yuki Store in the domain.
To assign a project:
- hover your mouse over the line of the relevant bank transaction or general journal entry
- click on the button with the three dots
- select Assign project from the dropdown menu
The following screen is opened: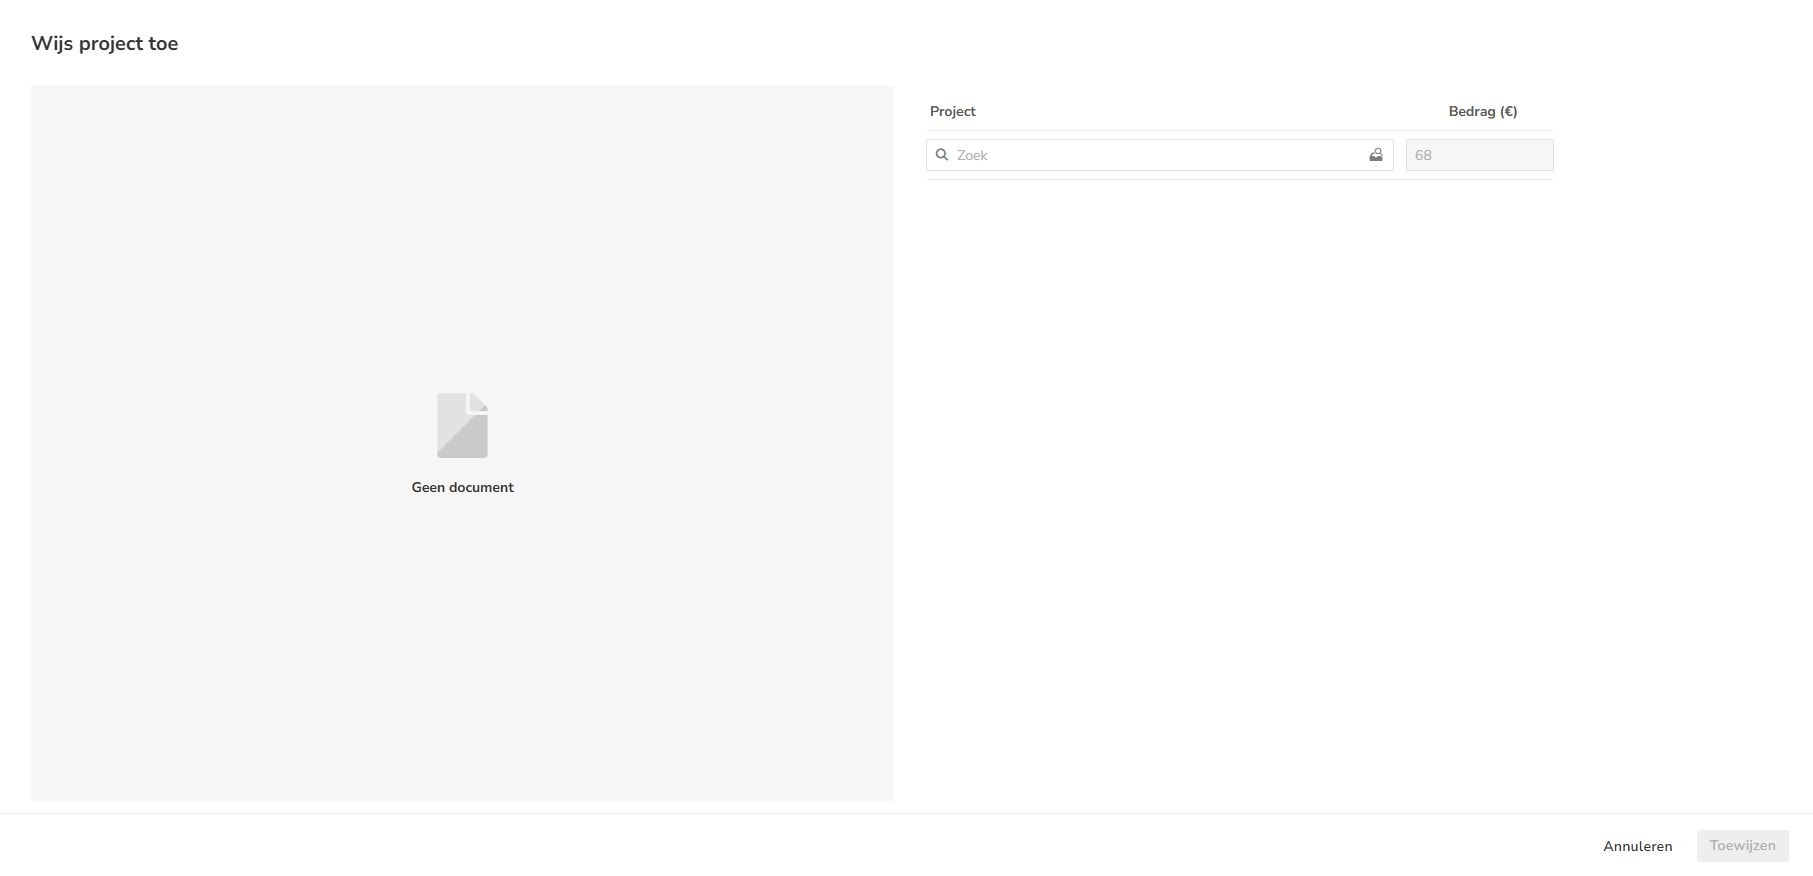
- select the project you want to assign
- then click on the Assign button.
The following message appears on the screen: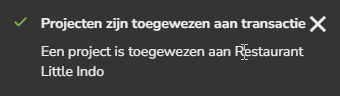
The screen now shows the project assigned to the bank transaction or general journal entry in the 'Project' column:
For a detailed description see article Link bank transaction to project or Link general journal entry to project.
Change or delete assigned project
A project assigned to a bank transaction or general journal entry be changed or deleted.
To change or delete an assigned project:
- hover your mouse over the line of the bank transaction or general journal entry in question
- click on button with the three dots
- select Edit assigned project from the dropdown menu
The following screen is opened:
- change or remove the assigned project
- then click on the Save button.
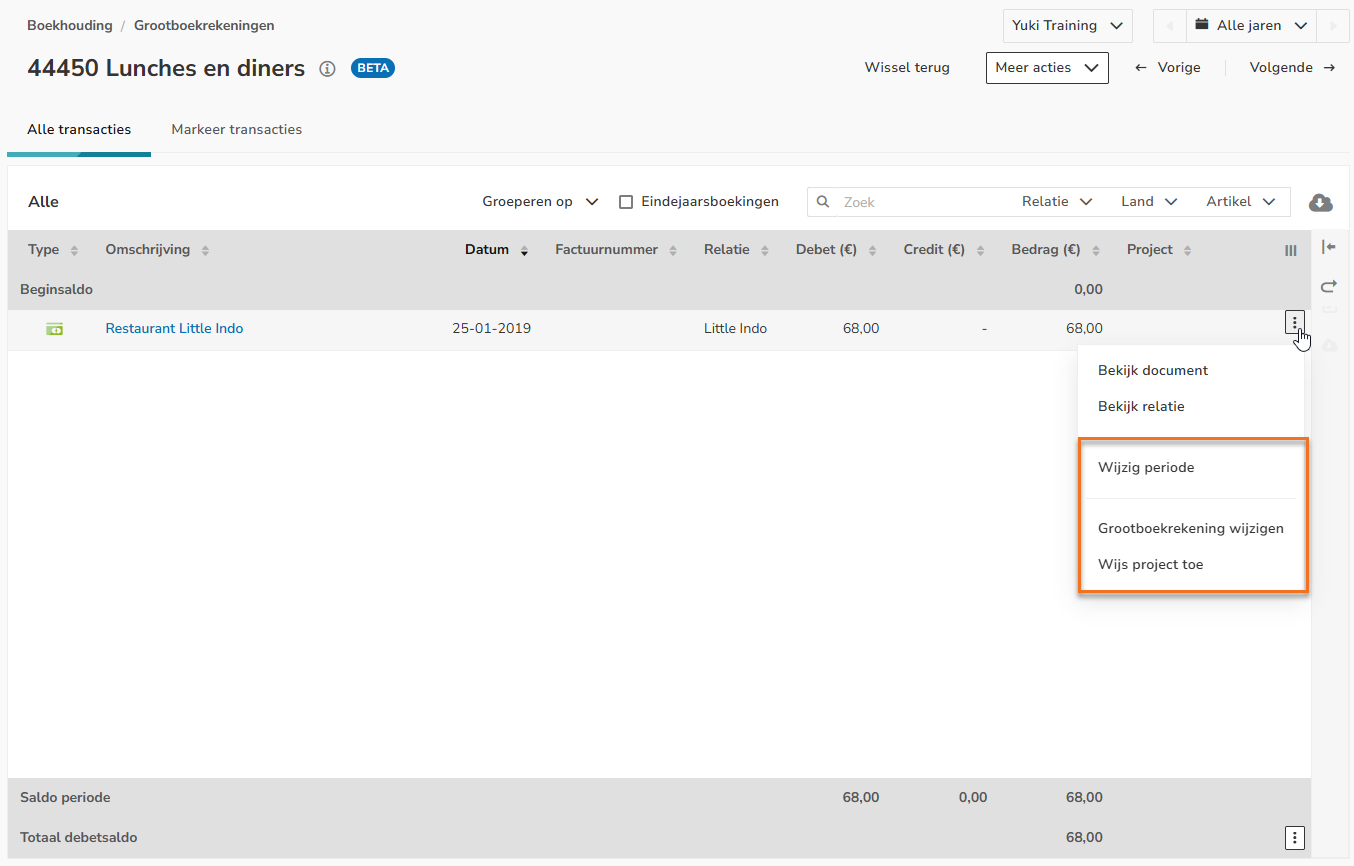
Post-editing functions for GL account
To use the post-editing functions for a GL account:
- click on the button with the three dots behind the GL account total balance
- select the post-editing function you want to use from the dropdown menu:
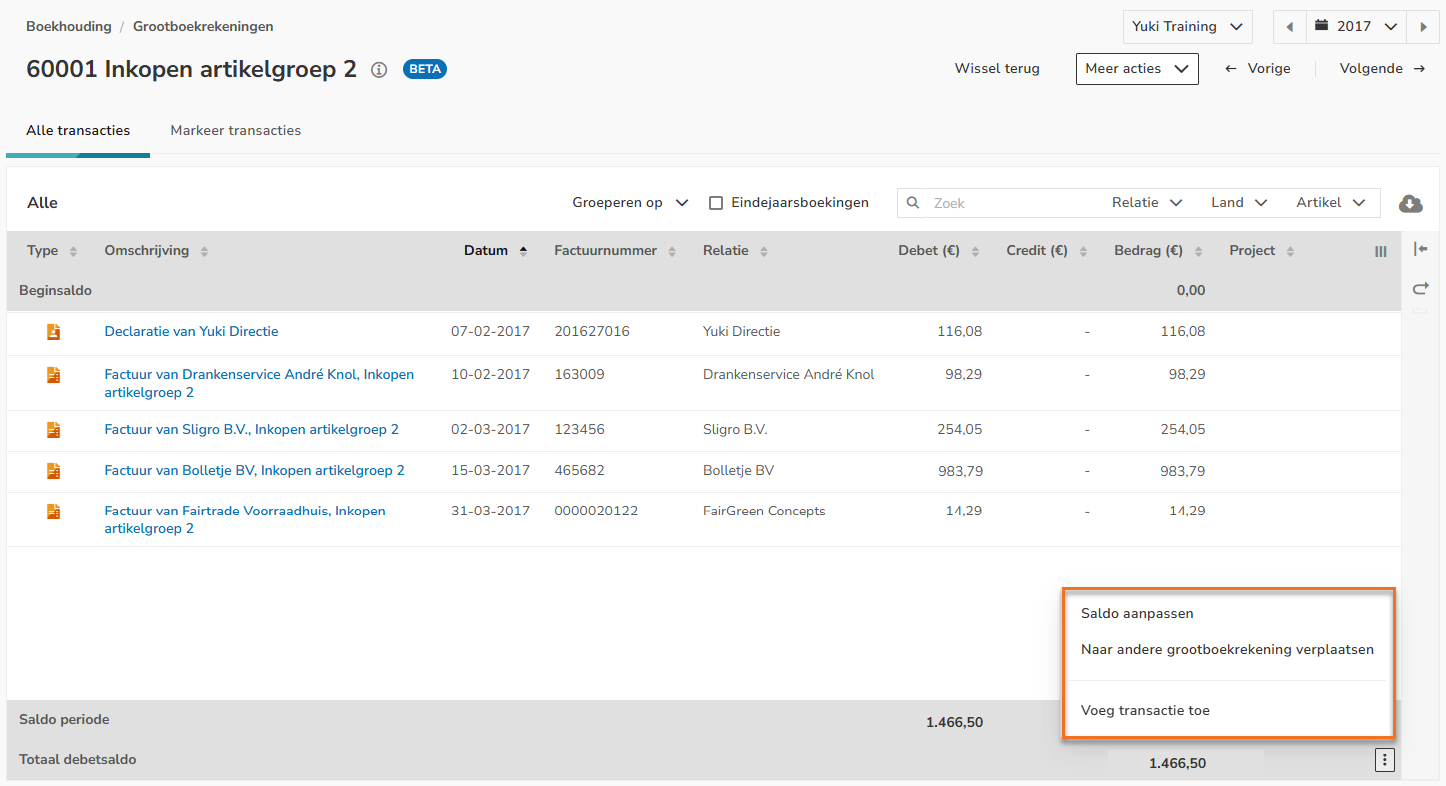
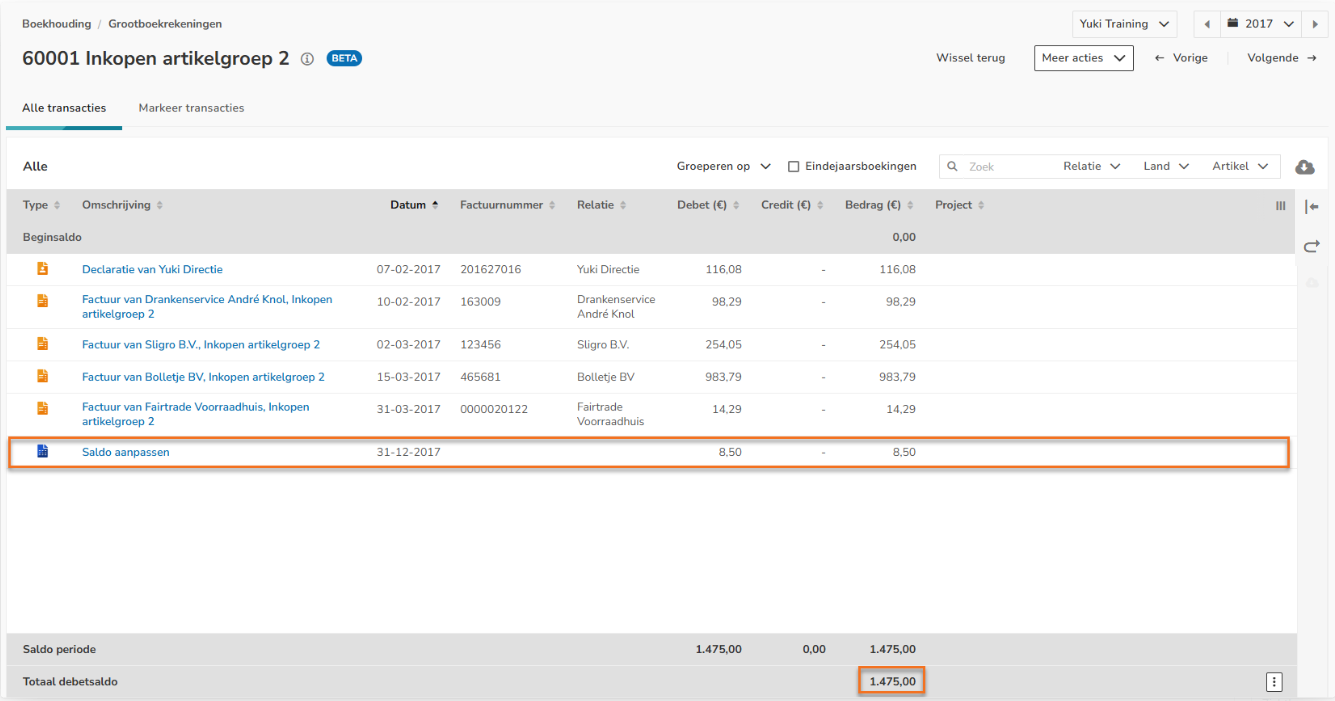
Change balance
You can adjust the total balance of a GL account by posting the difference to the new balance. This difference may arise e.g. due to foreign currency conversion, expected inventory, etc.
To change the balance
- click on the button with the three dots behind the total debit or credit balance of the GL account
- select Change balance from the dropdown menu
The following screen is opened: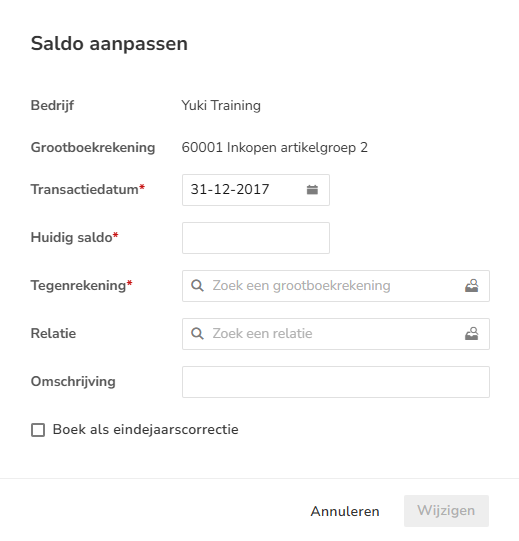
- enter the current balance
- select the correct offset account
- then click on the Change button.
The total balance has been adjusted, and a general journal entry has been created on the GL account and the offset account selected above.
Move to other GL account
You can move the GL account total balance to another GL account.
To move to other GL account:
- click on the button with the three dots behind the GL account total balance
- select Move balance to other GL account from the dropdown menu
The following screen is opened: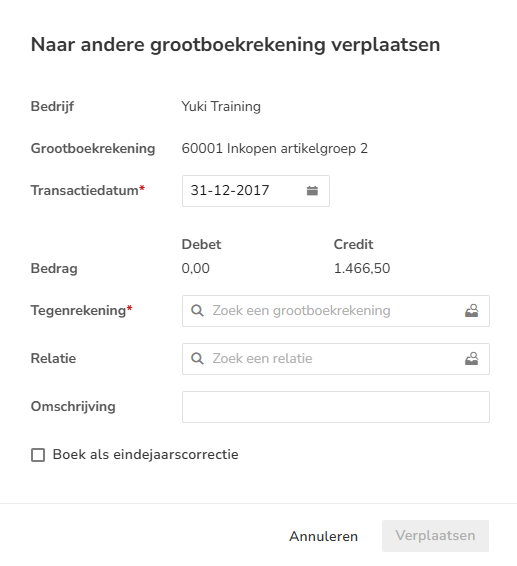
- select the appropriate GL account
- then click on the Move button.
The following message appears on the screen:
The invoices remain in the same GL account.
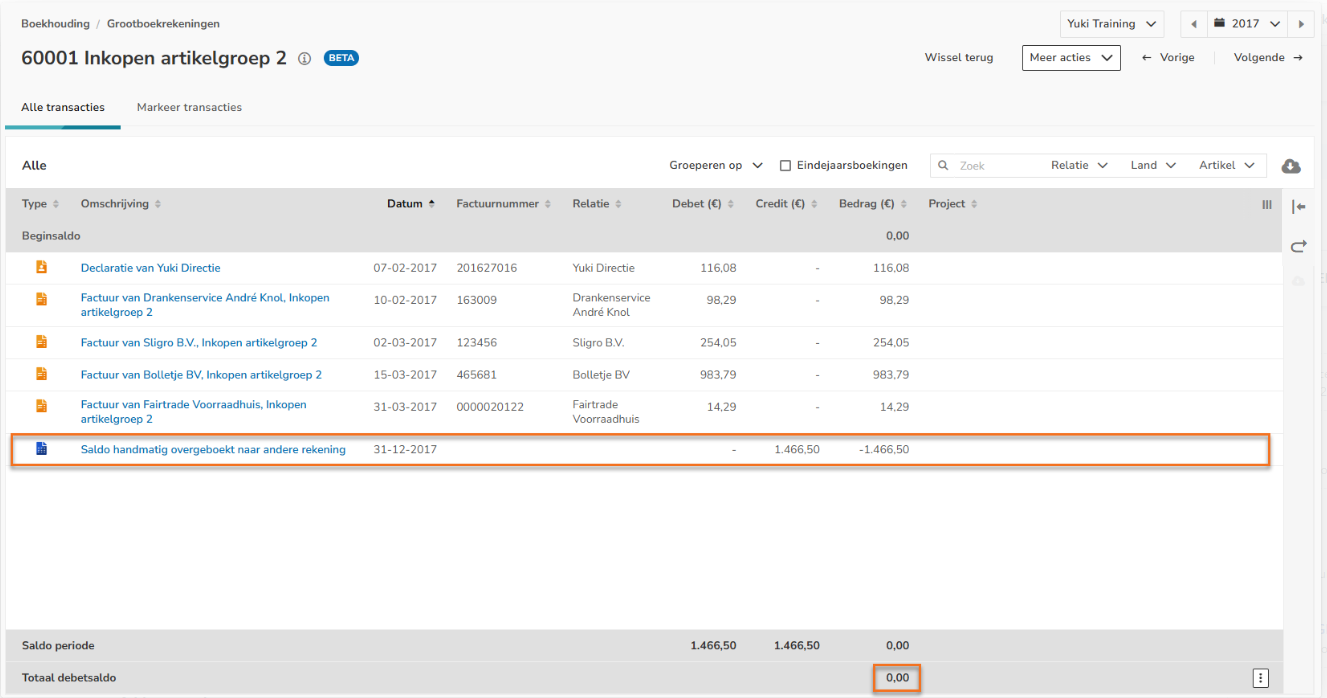
You can now see that the total debit or credit balance of the GL account is at 0.00 and a general journal entry has been created.
Add transaction
You can add a general journal transaction to the GL account of e.g. pending charges.
To add a transaction:
- click on the button with the three dots behind the total balance of the GL account
- select Add transaction from the dropdown menu
The following screen is opened: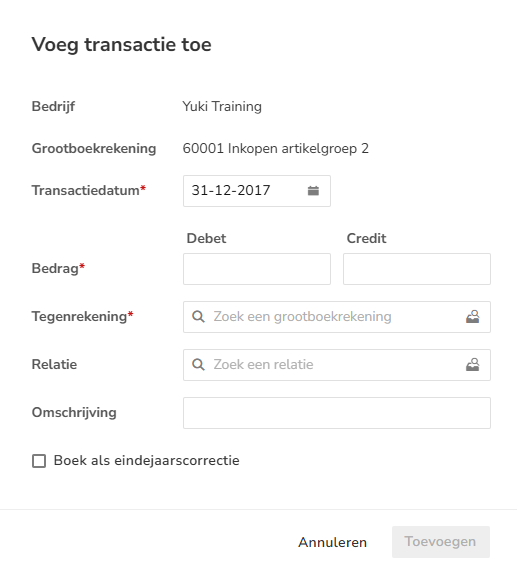
- enter the amount of the transaction to be added
- select the correct offset account
- then click on the Add button.
The following message appears on the screen:
Was this article helpful?
That’s Great!
Thank you for your feedback
Sorry! We couldn't be helpful
Thank you for your feedback
Feedback sent
We appreciate your effort and will try to fix the article