Yuki Pay (free of charge) and the additional feature Yuki Pay with Pay are both payment options within the Yuki Assistant NL app.
Yuki Pay with Pay is only available when a user with the ‘Management’ role has selected the bundle Small, Medium, Large or Unlimited via the Yuki Store in the domain.
Registration process
You must complete a registration process for Yuki Pay, which may require you to submit one or more documents, such as a Power of Attorney (EN) or a UBO document. Templates for both documents are included at the bottom of this article.
Once your registration has been approved, a business Yuki Pay checking account will be created in your Yuki administration and you will receive a digital Yuki Pay business payment card.
ATTENTION!
Yuki Pay can currently only be used for one administration per domain.
Who can register with Yuki Pay?
Only the owner of the domain with the ‘Management’ role can complete the registration with Yuki Pay from the Yuki Assistant NL app.
You can start the registration at any time by clicking on the Yuki Pay button.
However, it is essential that the person who starts the registration is also the person who will actually use the Yuki Pay payment card.
If the registration is paused or canceled, another user cannot restart or complete the registration process.
To check who is currently the owner of the domain:
- click on the Settings icon in the navigation bar
- in the now-opened screen, in the Domain section click on General.
The following screen is opened: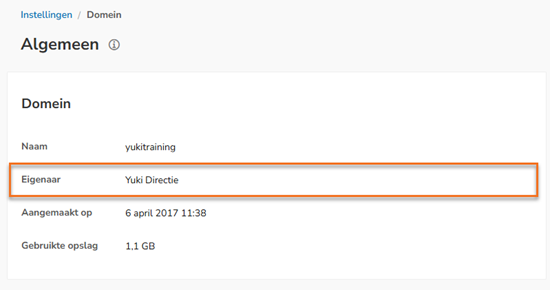
Contact your accountant when you want to start using Yuki Pay and you are not the owner of the domain.
Verification of information provided
It may take one business day for the information provided during registration to be verified and your registration to be approved.
You will receive a notification on your phone about the status of your registration with Yuki Pay.
For a detailed description, see article Status of registration with Yuki Pay.
Register BV, NV, or VOF
Follow the steps described below in the Yuki Assistant NL app to register with Yuki Pay.
Step 1. On the home screen of the Yuki Assistant NL app, click on Yuki Pay

Step 2. Carefully read Swan's Terms and Conditions and Yuki's Partnership Terms and Conditions.
TIP!
Make sure that, if applicable, the UBO statement has already been downloaded, completed and signed.
Then click on the Next button.

Step 3. Type here the legal name of your company as registered as a trade name with the Chamber of Commerce.
Then click on the Next button.
Step 4. Check the information about your company.
If the VAT number or Chamber of Commerce number is not available, your accountant should complete it.
The company address shown here must match the address as registered with the Chamber of Commerce.
ATTENTION!
Contact your accountant if the above information about your company is not correct.
In that case, click on the Complete later button.
If the company information is correct, then click on the Next button.
If your company address is not the same as your personal address enter the details of your personal address and then click on the Next button.
If your company address is the same as your personal address click on Same address,
Step 5a. Finally, provide additional information about your company here:
Select the core activities of your company and provide a brief description of them.
ATTENTION!
The core business you select here must be the same as those with which your company is registered with the Chamber of Commerce.
Step 5b. Then, indicate the expected transaction volume per month.
This information is purely indicative and does not affect the approval or rejection of your registration.
Then click on the Next button.
Step 6. Indicate here how you represent the company,
Are you an Ultimate Beneficial Owner (UBO) or a legal representative?
Then click on the Next button.
Stap 7. Select the type of participation here: ownership of capital, legal representative or other.
If there is a participation indicate the percentage of capital owned and whether this ownership is direct or indirect.
ATTENTION!
Direct ownership of capital means that the shares are in your own name, indirect ownership means that the shares are in the name of one or more other persons or a company.
In this screen, scroll down to enter the details of yourself or the relevant persons or company.
Then enter the details of the relevant person.
Then click on the Next button.
Step 8. Then, if applicable, enter the details of the other persons or company by clicking on the Add owner button.
TIP!
By clicking on the eye icon behind a UBO's name, you can change the details or delete the UBO.
After adding all owner data, click on the Next button.
Step 9. Click on the Attach file button to upload the sworn UBO statement.
TIP!
Click on the link Find our document template here to download a template of the UBO statement and complete and sign it, if necessary.
Then click on the Next button.
Step 10. To complete your registration, you must verify yourself. This is done based on your phone number and your identity (driver's license, passport or ID) through an SMS to your phone and a scan of your driver's license, passport or ID.
During the verification process, you also need to create a 6-digit access code to keep your payments secure.
In addition, you need to enter your birth information and details of your place of residence.
Then click on the Next button.
You have now provided all the data and documents for your registration with Yuki Pay.
Was this article helpful?
That’s Great!
Thank you for your feedback
Sorry! We couldn't be helpful
Thank you for your feedback
Feedback sent
We appreciate your effort and will try to fix the article