Disclaimer
All screenshots in the article were taken in the Dutch version of Yuki.
Yuki has a general marker tool that can be used for several purposes:
- marking transactions to explain the outstanding balance
- marking transactions because they need special attention
- marking transactions that belong together
- marking transactions quickly to calculate a total.
The marking tool is available in any domain and can be used on any GL account.
TIP!
First check that all transactions are correctly assigned to the GL accounts and/or the correct customers and suppliers are linked to the GL accounts, so that you avoid errors when reconciling.
A user with a 'Back office' role in the domain or the 'Management', 'Financial administration' or 'External accountant' role can mark transactions with the marking tool.
A GL account is opened from the trial balance, the chart of accounts or by clicking on the GL account in an open processed document.
From the opened GL account, click on Reconcile at the top of your screen. The following screen is opened:

All unmarked transactions are shown here.
Resizeable document viewer
Click on the relevant invoice line and then on the Show / Hide button (icon with a right / left arrow) to show or hide the document preview on the screen.
To enlarge the displayed document preview, move your mouse over the two arrows to the left of the document preview and resize it to the final size.
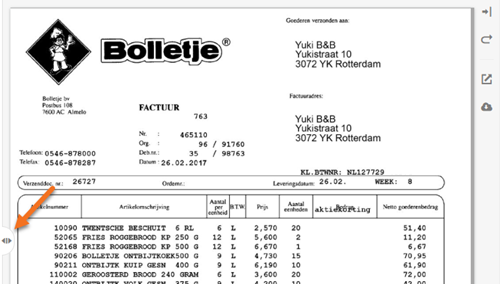
Additionally, in the document viewer you can:
- reset the document preview to the default size (curved arrow icon)
- open the document in the browser (square icon with a top-right arrow)
- download the document (cloud icon with a down arrow).
From this screen, a user can:
- define default marker settings
- mark (reconcile) transactions
- mark transactions in bulk or remove marking in bulk.
Views
You can also indicate in this screen that the All transactions view must be shown:

All unmarked and marked transactions are shown here.
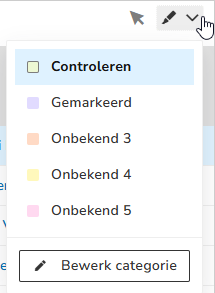
Define default marker settings
The default marker settings are the settings for the categories you can use to mark transactions on GL accounts. You can set a default category name for each color. At the bottom of the screen, you see the total of all transactions that fall under a specific category.
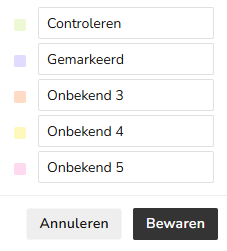
To change the name of one or more categories, click on the button with the brush.
Click on the Edit categories button. In the now-opened screen, change the name of one or more categories and then click
on the Save button.
Mark (reconcile) transactions
To mark transactions on a GL account:
- first choose a category with its corresponding color by clicking on the button with the brush at the top of the screen and then selecting one of the categories (colors).
- then click on the transaction(s) you want to highlight.
At the bottom of the screen, a total balance is kept for all transactions marked with the color of the selected category.

Unmark transaction(s)
To unmark a transaction:
- while marking, click on the relevant marked transaction(s)
OR - click on the eraser button and then on the transaction(s) whose marking you want to undo.

TIP!
If you want to use the selected category (color) to mark (reconcile) more GL accounts, click on Prev or Next at the top of the screen to scroll through the GL accounts of the chart of accounts, so to speak.
When you have finished marking (reconciling) transactions on a GL account, click on All transactions at the top of your screen to switch back to the GL account's default view.
Mark transactions in bulk or undo marking in bulk
To mark all unmarked transactions on a GL account at once, click on the Mark all unmarked button.
To unmark all marked transactions on a GL account at once, click on the Clear all button.

ATTENTION!
Marking transactions in bulk or unmarking in bulk applies only to those transactions that fall within the selected period.
Was this article helpful?
That’s Great!
Thank you for your feedback
Sorry! We couldn't be helpful
Thank you for your feedback
Feedback sent
We appreciate your effort and will try to fix the article