Disclaimer
All screenshots in the article were taken in the Dutch version of Yuki.
Before you start creating and sending sales invoices, you must first enter, check, and/or update the sales invoice settings.
ATTENTION!
Different sales settings can be defined for each administration within a domain.
You can set the following settings for sales invoices:
Each setting is described in detail in a separate article. |
Access to Sales settings
To access:
- click on the Sales icon in the navigation bar
- then click on Sales settings
- in the now-opened screen, select the Sending method tab.
Sending method settings
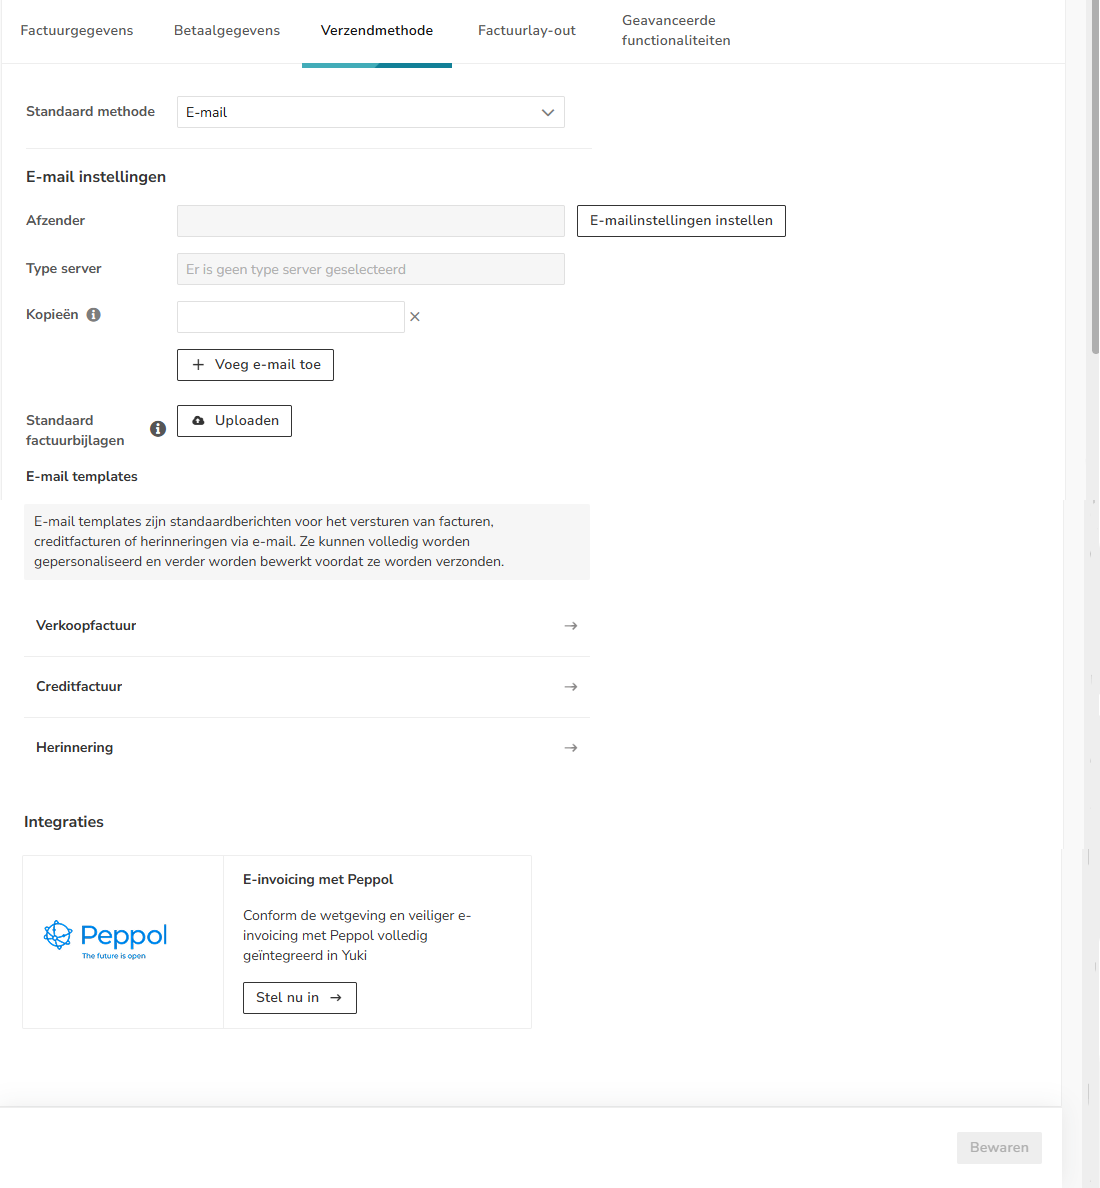
The following sending method settings can be entered.
Standard method
The standard method for sales invoices should be selected here:
- Send manually: a print file is created from the processed invoices. If the customer-specific setting is set to 'Email', the invoice is not processed
- Email: depending on the customer-specific setting and the presence of an email address, it is determined whether the invoice is sent by email or manually.
- Peppol: depending on the customer-specific setting, registration with Peppol and the presence of an email address, it is determined whether the invoice is sent via Peppol, by email or manually.
Email settings
Sender
To ensure you can send your sales invoices to your customers via email from Yuki, click on the Setup email settings button to configure email sending.
The following screen is opened:

To show customers that the sales invoice is from you, you need to enter the email address from which the sales invoices are sent here.
This must be an existing email address.
Click on the Next button. The following message appears on the screen:

The following screen is opened:

After entering your email address, you will receive a confirmation email from Yuki at that email address to confirm your email address.
Confirm your email address from your inbox and then click on the Next button.
The following screen is opened:

ATTENTION!
In order to send sales invoices from Yuki using your own email address, the DNS records must be changed.
To set the correct DNS records, contact your domain's hosting party.
In certain cases, DNS records cannot be applied unchanged, so please seek professional advice before changing your DNS records.
Type server
Here it is specified that sales invoices are sent via Yuki's “virtual” mail server.
When email sending is set up correctly, the status Active is shown.

You can view and change the email settings if necessary by clicking on the View settings button.
The following screen is opened:

Copies
All email addresses added in this field also receive the sales invoice e-mails because they are added as CC when sending the sales invoices.
TIP!
If yourself wish to receive a copy of the sent sales invoices to verify that all sales invoices were sent correctly, please enter here the email address where the copy should be sent to. There is no need to send the sales invoices to Yuki again. After processing, the copy of the sales invoice is automatically saved in the archive and processed in your administration.
Default invoice attachments
The documents you upload here are automatically added to every sales invoice you send to your customers.
You can upload up to 3 attachments totaling 5 MB. The following file types are supported: PDF, DOC(X), XLS(X), PPT(X), TXT, JPG, PNG, BMP, and GIF.tip.
Email templates
Here you can define for a sales invoice, credit note and/or reminder the default subject and message of the Dutch, English or French e-mail containing the invoice.
Click on > behind sales invoice, credit note or reminder to open the relevant email template editor:

Type in the subject and message of the email as it should be sent to the customer.
Dynamic placeholders
You can personalize the email subject and message by using dynamic text placeholders. Simply copy and paste a placeholder into the subject and/or message of the email.
Hover your mouse over a placeholder to view its description.

Click on the Save button to save the changes to an e-mail template.
Integrations
You can also select Peppol as the default shipping method for your sales invoices.
Peppol is a European initiative to standardize e-invoicing. It enables safer sending and receiving of e-invoices to and from governments, ministries and other relations that are also in the secure Peppol network.
For more information about Peppol, see https://peppolautoriteit.nl/ and https://peppol.eu/.
.
For a detailed description of Peppol, see article Peppol.
Register company (administration in Yuki) with Peppol
To use the Peppol network for receiving and/or sending e-invoices, you must register your company (read administration in Yuki) via a so-called Access Point.
To register an administration, the Chamber of Commerce number and VAT number must be entered in Yuki on a mandatory basis.
ATTENTION!
If a company is not subject to VAT, only the CoC number must be entered on a mandatory basis.
Only the accountant can change the CoC number and/or VAT number.

Click on the Set up now button to begin registering your company with Peppol.
The following screen is opened:

Hover your mouse over the line of the company you want to register with Peppol, then click on the Register button.

The following screen is opened:

ATTENTION!
If the option to register your company to receive invoices with Peppol is not available, you must first sign out from the appropriate existing Access Point.
Click on the Register button to actually register the administration with Peppol.
The following message will appears on the screen:

In addition, the default sending method of your sales invoices in Yuki is changed immediately:

The relevant administration is now registered with Peppol so from this moment on, depending on the e-invoicing preferences selected, e-invoices can be received and/or sent.
When sending via Peppol is set up correctly, the Active status is shown.

Was this article helpful?
That’s Great!
Thank you for your feedback
Sorry! We couldn't be helpful
Thank you for your feedback
Feedback sent
We appreciate your effort and will try to fix the article