Disclaimer
All screenshots in the article were taken in the Dutch version of Yuki.
Before you can create and send sales invoices to your customers, you naturally need to create one or more sales items first.
A created sales item is always automatically added to the price list of the selected administration within a domain.
Access to new sales item
You can create a sales item in Yuki from two places:
- hover your mouse over the Sales icon in the navigation bar
- click on Dashboard
- then in the now-opened screen, click on the Sales item option from the Create... button.
OR - hover your mouse over the Sales icon in the navigation bar
- click on Sales items
- then in the now-opened screen, click on the Create item button.
Enter sales item details
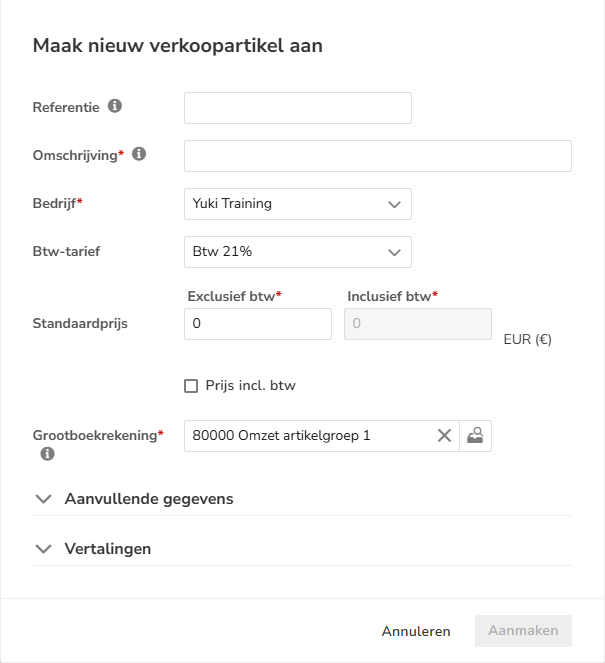
The sales item details can be entered in the fields described below.
Reference
The reference is the article code. This can be used to search for the sales item or to quickly enter them.
The reference can optionally be printed on the pdf invoice.
TIP!
When creating a UBL document linked to the sales invoice, the reference is stored in the ‘Sellersitemidentification’ field.
Description (required)
This is the description that can be shown on the invoice. The description can still be changed while entering the invoice.
Company
If more than one company (administration) is present in the domain select the administration for which you want to create a sales item here.
VAT rate
Select the VAT rate that normally applies to this sales item here.
Standard price
Here you enter the standard selling price excluding VAT of the sales item. Yuki automatically calculates the selling price including VAT based on the VAT rate.
Price incl. VAT
Select this option if you want to enter the standard selling price of the sales item including VAT. Yuki will then automatically calculate the selling price excluding VAT based on the VAT rate.
GL account (required)
Here, search for and select the general ledger account to which the revenue from this sales item should be posted by Yuki by default.
You cannot select a cost account here.
Additional details
Extra description
The content of this field will be displayed on the invoice directly below the invoice line of the relevant sales item.
Internal remark
In this field, you can optionally record internal notes about the sales item. Thus, the contents of this field will not be shown on the invoice.
Translations
It is also possible to enter an English or French description by clicking on the arrow before 'Translations'.
If English or French is chosen as the language in the Sales settings on the Layout tab, this description will be used.
TIP!
To create an English or French invoice for a customer once, select the appropriate language while creating the invoice.
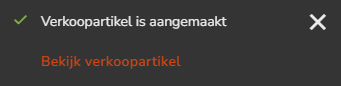
After entering the details, click on the Create button to create the sales item in the price list of the selected administration.
The following message appears on the screen:
Was this article helpful?
That’s Great!
Thank you for your feedback
Sorry! We couldn't be helpful
Thank you for your feedback
Feedback sent
We appreciate your effort and will try to fix the article