Disclaimer
All screenshots in the article were taken in the Dutch version of Yuki.
A contact has to give permission to a beneficiary via a direct debit mandate to automatically withdraw amounts of the corporate bank account continuously or once in order to collect your sales invoices via a SEPA collection file.
The direct debit type (corporate or general) that has to be created for contacts in Yuki depends on your SEPA direct debit contract with the bank.
TIP!
It is important that the bank account (with the IBAN number) of the contact is created before the direc debit mandate is created. The BIC that is used by Dutch banks is automatically entered by Yuki.
ATTENTION!
A contact's signed direct debit mandate must be downloaded as a PDF file and sent to the bank.
Go through the following steps in order to create the necessary direct debiit mandates:
- first check with missing mandates which direct debit mandates are still missing or are still incomplete (warning)
- check in the register of which direct debit mandates the data is still incomplete.
In the register you can create a new mandate. From missing mandates you can create one or more direct debit manadates at once.
Only an user with the 'Back office' role in the domain or the 'Management', 'Financial administration' or 'External accountant' role can create a SEPA direct debit mandate.
Access to SEPA direct debit mandate
To access:
- click on the Contacts icon in the navigation bar
- search for and open the contact card of the customer in question
- then, in the now-opened screen, click on Direct debit mandates under Data
OR - click on the Bank icon in the navigation bar
- in the now-opened screen, click on Collect under Report
- then, in the now-opened screen, clcik on Register or Missing mandates under Mandates.
TIP!
A direct debit mandate is only linked to a sales invoice when the invoice is included in a draft SEPA collection file. However when the direct debit mandate is then terminated an error message will appear stating that the invoice cannot be processed because the direct debit manadate is not active.
The direct debit mandate is actually linked to a sales invoice from the moment that the draft SEPA collection file is finalized.
Missing mandates
Click missing mandates on the left of your screen in order to view all contacts (with invoices to be settled) without a direct debit mandate.

This overview can be filtered by:
- all customers
- customers with outstanding collection invoices
- customers that have been invoiced in the past month
- customers that have been invoiced in the past haf year
- customers that have been invoiced in the past year.
In addition you can also show all contacts where no IBAN is entered.
Create one or more direct debit mandates at once
- Enter one or more of the following default values of the direct debit mandate: Reference, Type, Description and Start date.
- Select the relevant suggested direct debit mandates.
- Click on the Apply to selection link in the upper right of your screen.
- Check if all data of the suggested direct debit mandates is correct. Change the data if necessary.
- Click onthe Create button at the top of your screen.
Register
You can view all the created direct debit mandates by clicking on the Register button.
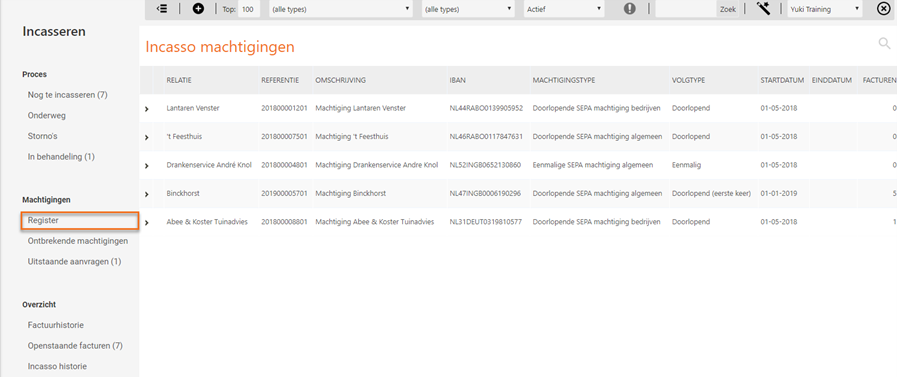
By default only the active direct debit mandates are shown in the register.
Click on> in front of the relevant mandate to complete the data.
TIP!
When a direct debit mandate is already used for the collection of an invoice then the type, the start date, the bank account and the reference of the mandate cannot be changed anymore. In that case a new direct debit mandate with a new start date has to be created.
You can find all the direct debit mandates of whicih the data is still incomplete (red triangle) by selecting the Containing warnings option in the dropdpwn menu at the top of your screen.

Create new direct debit mandate
Click on the New button. The following screen is opened:
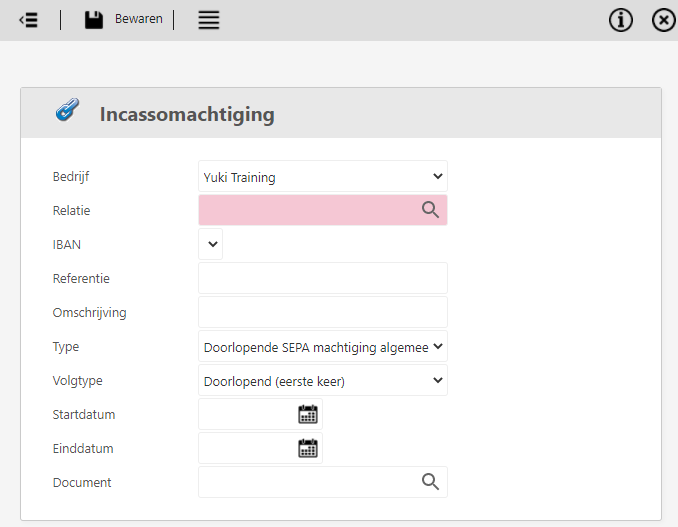
The following data can be entered:
Company
Here you have to select the administration wherein the mandate should be created.
Contact
Here you have to enter the company or the person of whom you want to collect the invoices.
IBAN
Ensure that an IBAN number and BIC code are linked to the contact before the direct debit mandate is created.
Reference
You haved to enter the reference yourself. It must meet the following requirements:
- It must be unique in combination with the collector ID
- It may not be longer than 35 positions and has to consist of characters and/or digits (alphanumeric).
Description
This field can be left blank. However without a description it is not possible to generate a PDF file of the mandate.
Type
You can choose between four different mandates:
- One-off general SEPA mandate (private and corporate account holders, reversal is allowed)
- Recurrent general SEPA mandate (private and corporate account holders, reversal is allowed)
- One-off corporate SEPA mandate (only corporate account holders, reversal is not allowed)
- Recurrent corporate SEPA mandate (only corporate account holders, reversal is not allowed).
Subtype
When a continuous SEPA mandate has been selected then you can choose between two options in the 'Type' field:
- Recurrent (first use)
- Recurrent.
If the invoices are collected for the first time with a continuous SEPA mandate then you always have to choose for the 'Recurrent (first use)' option.
All recurrrent direct debits are now submitted as 'Recurrent' (RCUR) type. When using a recurrent direct debit mandate no distinction have to be made anymore between the first (FRST) and the following (RCUR) direct debits.
Start date
The start date is the date on which the contact has signed the direct debit mandate. Entering a start date is therefore only meaningful when you have already received a signed direct debit mandate of the contact.
TIPS!
- The start date may never be later than the first collection order.
- If a ClieOp direct debit mandate has already been created for the contact then 01-11-2009 can be entered as the start date. This is in compliance with the requirements concerning the continuance of already existing direct debit agreements.
End date
This field can be left blank when the end date is not known..
Document
You can upload a document signed by the contact in Yuki and next link this to a created direct debit mandate.
After entering all the data of the mandate click on the Save button.
The data of a contact should be complete, If this is not the case a notification will appear on your screen when saving the new direct debit mandate:
Was this article helpful?
That’s Great!
Thank you for your feedback
Sorry! We couldn't be helpful
Thank you for your feedback
Feedback sent
We appreciate your effort and will try to fix the article